

There are a number of ways you can create audio with The Amazing Audio Engine:
- You can play an audio file, with AEAudioFilePlayer.
- You can create a block to generate audio programmatically, using AEBlockChannel.
- You can create an Objective-C class that implements the AEAudioPlayable protocol.
- You can even use an Audio Unit, using the AEAudioUnitChannel class.
Playing Audio Files
AEAudioFilePlayer supports any audio format supported by the underlying system, and has a number of handy features:
- Looping
- Position seeking/scrubbing
- One-shot playback with a block to call upon completion
- Pan, volume, mute
To use it, call audioFilePlayerWithURL:error: , like so:
If you'd like the audio to loop, you can set loop to YES. Take a look at the class documentation for more things you can do.
Block Channels
AEBlockChannel is a class that allows you to create a block to generate audio programmatically. Call channelWithBlock:, passing in your block implementation in the form defined by AEBlockChannelBlock:
The block will be called with three parameters:
- A timestamp that corresponds to the time the audio will reach the device audio output. Timestamp will be automatically offset to factor in system latency if AEAudioController's automaticLatencyManagement property is YES (the default). If you disable this setting and latency compensation is important, this should be offset by the value returned from AEAudioControllerOutputLatency .
- the number of audio frames you are expected to produce, and
- an AudioBufferList in which to store the generated audio.
Objective-C Object Channels
The AEAudioPlayable protocol defines an interface that you can conform to in order to create Objective-C classes that can act as channels.
The protocol requires that you define a method that returns a pointer to a C function that takes the form defined by AEAudioRenderCallback. This C function will be called when audio is required.
If you put this C function within the @implementation block, you will be able to access instance variables via the C struct dereference operator, "->". Note that you should never make any Objective-C calls from within a Core Audio realtime thread, as this will cause performance problems and audio glitches. This includes accessing properties via the "." operator.
The render callback will be called with five parameters:
- A reference to your class,
- A reference to the AEAudioController instance,
- A timestamp that corresponds to the time the audio will reach the device audio output. Timestamp will be automatically offset to factor in system latency if AEAudioController's automaticLatencyManagement property is YES (the default). If you disable this setting and latency compensation is important, this should be offset by the value returned from AEAudioControllerOutputLatency .
- the number of audio frames you are expected to produce, and
- an AudioBufferList in which to store the generated audio.
Audio Unit Channels
The AEAudioUnitChannel class acts as a host for audio units, allowing you to use any generator audio unit as an audio source.
To use it, call initWithComponentDescription: , passing in an AudioComponentDescription structure (you can use the utility function AEAudioComponentDescriptionMake for this).
Once you have added the channel to the audio controller, you can then access the audio unit directly via the audioUnit property. You can also add your own initialization step via the initWithComponentDescription:preInitializeBlock: initializer.
Adding Channels
Once you've created a channel, you add it to the audio engine with addChannels:.
Note that you can use as many channels as the device can handle, and you can add/remove channels whenever you like, by calling addChannels: or removeChannels:.
Grouping Channels
The Amazing Audio Engine provides channel groups, which let you construct trees of channels so you can do things with them together.
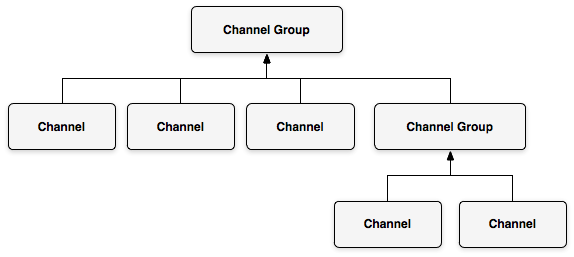
Create channel groups by calling createChannelGroup or create subgroups with createChannelGroupWithinChannelGroup:, then add channels to these groups by calling toChannelGroup:addChannels:toChannelGroup:.
You can then perform a variety of operations on the channel groups, such as setting volume and pan , and adding filters and audio receivers, which we shall cover next.
So, you're creating audio - now it's time to do something with it: Filtering.